Having issues with your current wifi network? No need for trouble! The Netgear extender will fix this easily. Additionally, this networking device will extend the network that you want. Likewise, to learn how to connect Netgear wifi extender, you can walk through the guide we shared with you.
Here, you find three different methods to connect the range booster to your existing network. Similarly, we highlight the detailed instructions on how to connect Netgear wifi extender to new router. Therefore, to explore more about configuring this repeater to your home network, walk through our complete guide!
How to connect Netgear wifi extender?
Moreover, you can connect your range booster to the existing or new network by using three different methods. Initially, you can go ahead with the web GUI, application, and the WPS procedure. Similarly, we highlight the detailed instructions for each process to learn how to connect Netgear wifi extender to the router’s network. Let’s take a look below:
Web GUI (mywifiext.com)

- To begin with, confirm that your networking device is powered on.
- Next, join the Netgear extender network, shown as Netgear_Ext, by using your computer/laptop.
- After that, start the web browser on your computer and enter mywifiext.com web address in the browser bar.
- A login window prompts you, so enter the accurate admin details in the login window.
- Next to this, you land on the Setup wizard of the repeater.
- Hereon, the “New Extender Page Setup” screen displays to you.
- Click on this option and accept the Terms & Conditions while this page displays to you.
- The detailed steps are explained here to understand how to connect Netgear wifi extender process.
- Now, set a new “Administrator username and password” on the next page.
- Afterward, set two security questions and then click Next.
- At this point, the extender will search for the available networks.
- Choose the router network that you want to extend and “enter a password” for it.
- Hereon, you are asked to “set the extender username and password” as of your existing network, otherwise you can change them.
- Further, follow the on-screen instructions to complete the configuration.
- Now, check the Power & Router LEDs to turn solid Blue/Green.
- In the end, your extender is successfully connected to the preferred router’s network.
- You are now aware of how to connect Netgear wifi extender efficiently.
WPS Button
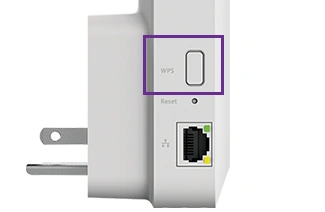
- Primarily, position your repeater closer to the router.
- If you buy a new router, then place the extender closer to the new gateway.
- After that, confirm that your Netgear extender is powered on.
- Now, locate the WPS button on the new/existing router, and then on the range booster.
- Moving further, press the WPS knob on the router first and then on the extender within two minutes.
- Check the router icon LED on the extender turns solid Blue/Green.
- Now, let the buttons go off, and the repeater successfully connects to the router’s network that you want to extend.
- Finally, you understand how to connect Netgear wifi extender to new router using WPS only.
Nighthawk Application
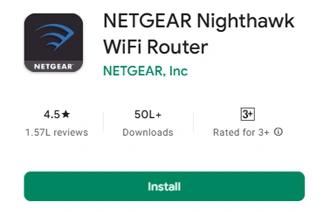
- Firstly, confirm that you have an updated version of the Nighthawk app on your smartphone.
- Next, connect your smartphone to the repeater’s network.
- After that, launch the application and key in accurate admin details to access the user account.
- After logging in, you reach the home dashboard of the router.
- Hereon, click on the Menu option on the top right corner and then click on “Setup a New Nighthawk System.”
- Further, tap on the “Get Started>choose Range Extender.”
- You are asked to join the Netgear extender network, then click on “WiFi Connected.”
- Next to this, you see the “Personalize Your Settings” screen, tap on Next here.
- Now, the app will scan for the available networks.
- Hereon, choose your preferred router network and type in the password for the chosen network.
- Moving forward, the “Set up Administrator Password” page prompts you.
- Here, write in the Admin name and security key, which should be different from the wifi network details.
- Further, select two security questions and answer them.
- Now, follow the further guidelines to complete the extender settings.
- At last, the whole process of how to connect Netgear wifi extender to the existing internet connection is clear to you.
In closing
All things considered, this brief guide walks you through the complete information regarding how to connect Netgear wifi extender. Similarly, you can explore three different methods to configure your repeater with the available router’s network. You also know the detailed steps to configure your range booster to the new router’s internet using the WPS process. Hope this concise guide will assist you in linking your extender to the preferred gateway’s network without any hassle.