Do you seek help with Netgear wifi extender installation? No need to worry! You are at the right place. Here, you learn the methods to detailed steps from unboxing to installation of the range extender. Also, this brief guide outlines each piece of information that you need to begin and end the procedure.
How to install a Netgear wifi extender using simple steps?
While you are going ahead, to begin with the extender installation, then it is necessary to unbox the repeater and check its components. After that, you can proceed with the Netgear wifi extender installation process. Similarly, we highlight the detailed steps to unpack the repeater and position it:
Unpack the repeater
- Firstly, uncover the extender pack by removing the plain film around it.
- After that, check the extender components inside it as these are not cracked.
- Next, attach the antennas to the repeater (If given).
- Afterward, look at the user manual provided in the box.
- Now, test your extender by plugging it into a nearby power outlet.
Steps for Netgear wifi extender installation
When you are done with the unpacking of the range booster, you need to install it and connect to the available home network. In this section, we shed light on the detailed steps to install your repeater, take a closer look:
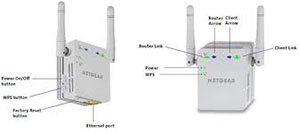
- Initially, check the extender model you bought as it is a Wall plug or a desktop.
- After that, switch to the extender if it has two modes: Access point & extender.
- Next, join the range extender to the router using an ethernet cable.
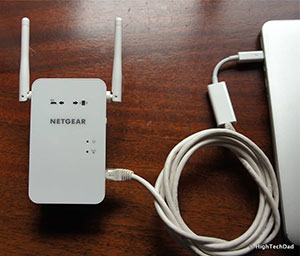
- If it is wireless, then the user will directly connect it to the router network.
- Further, plug in the extender and turn it on.
- If the power LED does not turn on, then press the power button.
- Further, use a computer/smartphone to connect to the extender network.
- Also, the WPS button method is quite an easy way to join a repeater network.
- After connecting to the network, you can reposition it anywhere.
- Finally, you are all set with the Netgear extender installation.
Troubleshooting steps to avoid Netgear wifi extender installation issues
Moreover, in the above sections, you learn how to install a Netgear wifi extender on your own. Additionally, users sometimes get stuck with the installation procedure due to various reasons. Therefore, we highlight the detailed steps here to troubleshoot those issues, have a glance once:
- Firstly, confirm the sufficient power supply to your range extender ensuring the recommended voltage.
- Place the repeater closer to the primary router.
- Do not use burnt or cracked electrical outlets.
- Ensure the strong signal strength while connecting your range booster to the router.
- If you find any hardware damaged, then replace it immediately.
- Eliminate the signal barriers, like microwaves, mirrors, furniture, etc.
- Check the cable connections as these are tightened enough and not faulty.
- If you have issues with the wireless extender, then you can opt for the ethernet cable.
- While opening the extender box, one must read the instructions on the box.
- If using the dual mode repeater, then ensure to switch it to the extender mode.
Bottom Line
All things considered, you find this guide beneficial to executing the Netgear wifi extender installation process. Additionally, you explore the detailed steps from unpacking to installing the Netgear repeater. Have more queries? Reach our tech experts here!